


While a number of basement waterproofing methods have been devised in order to prevent water from seeping into basements, water still tends to find a way. Though we can’t always keep water from coming into our basements, we can do something to get it out of our basements in a timely manner.
A drain tile will collect any standing water which enters your basement, flushing it back outside where it belongs. Thinking about having a drain tile installed? Wondering what drain tile installation entails in Naperville? Read on to find out!
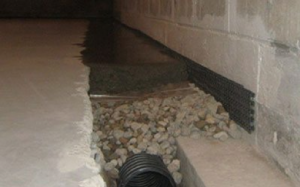
Interior Installation
 Drain tiles can be installed both inside and outside of your home. Depending on what type of drain tiles you’re having installed; the process will be just a little different. First, let’s discuss interior drain tile installation.
The process starts with the breaking up of concrete in your basement. This concrete will be broken into a roughly 12-inch x 18-inch box and will be located in the corner of your basement.
After concrete has been broken, a 10-inch-or-so deep trench will be dug in the soil. The trench will slope just slightly, running down into the sump pump basin. In situations where a sump pump basin doesn’t already exist, one can be installed.
Once this has been done, a water-absorbent gravel will be placed at the bottom of the trench. Then the drain tile will be laid down in the trench. As soon as the drain tile has been laid, it will be covered with additional gravel.
Next, a drainage mat will be placed over the gravel and the drain tile. This mat will be kept in place where the ground meets the wall. Lastly, the area will be covered with a layer of fresh cement.
Exterior Installation
The exterior drain tile installation process is similar to the interior installation process, but with a few differences. One key difference of this process is that utility lines must be located before any digging can take place. This is done to ensure that no leaks are sprung while digging.
After lines have been located, a trench will be dug in close proximity to the footer of the house. Then, plywood planking will be placed inside of this trench, sloping down into the sump area. A thin layer of stone and gravel will also be placed at the bottom of the trench.
Once this has been completed, a PVC pipe will be connected to the sump area, leading down into the soil.
Next, the tile will be covered with gravel as well as a drainage mat. This mat will connect to both the ground and the base of your home’s foundation. Once it has been laid down, it will be covered with additional stone and soil. This stone and soil will be spread until the trench is entirely filled in.
Drain Tile Advantages
While we hope to keep moisture out of our basements, the fact of the matter is can sometimes get around other attempts to stop it. Even if we’ve properly repaired cracks and have installed waterproof membranes, water can still sometimes find a way in.
However, we can’t just let this water sit in one place until it evaporates. Allowing it to do so will result in mold growth and poor air quality.
This water needs to be drained out of the basement as quickly as possible, which is where the drain tile comes in. Drain tiles capture water and send it back outside where it belongs, leaving basements as dry as technologically possible.
Looking for Professional Drain Tile Installation in Naperville?
Interested in waterproofing your basement? Looking for professional drain tile installation in Naperville, Illinois? If so, we here at ULB-DRY Waterproofing are the people to see.
Our team of experienced waterproofers is well-versed in the drain tile installation process. It is our goal to keep moisture out of your basement by applying our 25 years of experience.
Contact us today to get started!